MAC Lipstick Collection - Dark Edition.

So I wanted to do a post on my MAC lipstick collection but since I had so many I thought I would turn it into a series and what better way to enter Autumn than with my 'Dark Edition' of MAC lipsticks, I know they're not all dark but to me purples, plums and deeper colours go together. So here goes...


(Pictures with flash)
 
So left to right - First we have Up The Amp which is an amplified finish lipstick meaning it is a creamy finish with a slight sheen, it is a light purple almost lavender colour with tiny shimmers running through it. Second is Heroine which is a matte finish and although it is matte it is comfortable to wear and not drying on the lips, the colour is a true vibrant purple. Third is Amorous which looks a lot more of a deep berry colour in real life, this is a satin finish which is opaque but more of a glossy finish. Fourth is Rebel which is also a satin finish and is a deep plum/wine colour. Fifth is Matte Royal which is a matte royal blue colour and recently came out with the following colour Instigator in the Matte Lip Collection which I also have a post about. Instigator is really deep smoky purple colour. And finally we have the ever so famous Cyber which is also a satin finish, the colour is a mix between a deep purple and a deep brown.
If I had to pick one colour to wear solely for this fall I think I would pick Instigator as it is just a gorgeous deep, smoky purple and it would be really versatile with a range of looks this fall. Hope this post helped you pick your next MAC lipstick shade and keep an eye out for the next lipstick collection posts.

LUSH Cosmetics Dark Angels Cleanser.

After returning to the UK from the Australian sun and heat, I started to notice all these little bumps under my skin, so I headed to lush to find a deep exfoliator and I was recommended this cleanser by one of the girls in the Southampton store. Dark Angels claims to give you gorgeously glowing skin, anything that claims to give glow I am all about that life! 


After trialling this cleanser for a while now I am happy to share my thoughts on it. Dark Angels is a very intense cleanser, it contains black sugar and charcoal to exfoliate which kind of feels like it is scratching the skin but as long as you're gentle I don't actually mind that, at least I know it is doing something! The cleanser also contains rhassoul mud to deeply cleanse, avocado oil and vegetable glycerine to moisturise and soften skin after all of the exfoliating.
Overall the I am a massive fan of the LUSH Cosmetics Dark Angels cleanser leaves my skin feeling soft, smooth and rejuvenated. The only thing I will say about this cleanser is that the smell is slightly off putting to me as it is really earthy and also smells slightly like aniseed, but however I love this cleanser so much that I can see past the smell.  
 

Makeup Look - Champagne Eye.

So, I'm not one for going out partying every weekend but after a stressful week at work I thought I deserved to go out for a few drinks and be a bit more sociable than my usual Friday night in! Doing makeup really de-stresses me and makes me feel calmer, when it goes to plan of course. I was really in the mood to create a really eye-catching (no pun intended) champagne eye with a sharp winged liner. So this is the look I came up with and the products I used to create this look...

(Full Face Look)
(Eye Close Up)
 
So here is a complete run-down of all the products I used to create this makeup look...
  • Base Products - MAC Prep + Prime Natural Radiance Base Lumiere in Radiant Yellow all over the face followed by MAC Strobe Cream on the high points of my face, MAC Studio Face and Body Foundation in N2 followed by the Pro Longwear Concelear in NC30 and all that was set with MAC Mineralise Skin Finish in Medium Golden.
  • Contour, Highlight & Blush - Anastasia Beverly Hills Contour in Fawn, MAC Give Me Sun to Bronze, MAC Springsheen Blush & MAC Superb to Highlight.
  • Brows - Anastasia Beverly Hills Dipbrow Pomade in Dark Brown then set with MAC Pro Longwear Waterproof Brow Set in Bold Brunette.
  • Eyes - MAC shadows in Uninterrupted, Brown Script and Sweat Heat, Makeup Geek Gel Liner and Red Cherry Lashes in #43.
  • Lips - MAC Lip Liner in Whirl and Kat Von D Lipstick in Cathedral. 
All finished off with a spritz of MAC Fix+. I hope you enjoyed this post and hopefully I can do more like this in the future.
 

Eyebrow Tutorial.

I thought I would share with you what products I use on my brows and how I fill them in. These are the products that I use every single day, I don't change it up as I love these products so much and they work amazing for me. This is just how I do my brows as I like my brows quite bold but I understand that they're not for everyone.

 (Products I use Anastasia Beverly Hills Dipbrow Pomade, MAC Brow Set and a MAC 266 brush)
 (Pomade in Dark Brown and Brow Set in Bold Brunette)
 
 
Step 1 - I use the spooly to comb through my brows making sure all of the hairs are laying flat and facing in the right direction.
Step 2 - I take a little bit of the pomade on my 266 angled brush and draw a line along the top on my brow getting as sharp of an edge as possible and flicking it down to the tail.
Step 3 - Next I draw the underneath of my brow getting a sharp line and connecting it to the top at the tail of the brow. And I fill in the inner most part of my brow with the leftover product flicking the brush upwards mimicking the brow hairs.
Step 4 - I use concealer to neaten up the top and underneath of the brow to get a nice crisp edge.
Step 5 - I run the brow set through my entire brow to ensure the brows stay in place all day long.
Step 6 - The final result!
 
I hope this was helpful for anyone wondering how to use the Dipbrow Pomade or just wanting to know how I fill in my brows.

My MAC Palette - Neutral Edition.

The first product from MAC Cosmetics that I bought were 3 eye shadows and now here I am having completed a neutrals and a more colourful palette. Today I am going to share with you the shadows in my neutral palette.


I like to organise my palette from lightest going through to darkest shade as for me it is aesthetically pleasing to look at, slightly OCD I know.
Okay, so from the top row - left to right Shroom (satin), Nylon (frost), Brule (satin), Naked Lunch (frost) and Mythology (lustre) these are mostly my highlight shades and champagne lid colours.
Second row - left to right is Cork (satin), Texture (velvet), Haux (satin), Satin Taupe (frost) and Brown Script (matte), mostly crease colours with the exception of Satin Taupe which is a shimmer.
And the bottom row - left to right is Antiqued (veluxe pearl), Swiss Chocolate (matte), Twinks (veluxe pearl), Folie (satin) and Embark (matte).

Some of my favourite shades include Naked Lunch (perfect champagne shimmer), Brown Script (rich warm orange-brown) and Swiss Chocolate (think warm milk chocolate!).

Hope this post was helpful to anyone looking to buy their first MAC shadows and stay tuned I have my more colourful palette breakdown on the way!

Manuka Doctor ApiClear Purifying Facial Peel

After seeing Shaaanxo on YouTube raving about the Manuka Doctor ApiClean facial peel I decided to give it a try. Having won the 'Beauty Insiders' Choice' award three years in a row 2012-2014, there must be something amazing about this mask. Since getting back from Australia a month ago my skin has been acting up a lot more than usual, I don't know if this is due to the change in air or the water but quite frankly I am so over it! I ordered this product directly from the Manuka Doctor website, where it was actually on sale reduced from £29.99 to £14.95 for the 100ml.

 
Soon as it arrived I took off my makeup, cleansed my face and slapped this mask on! It has a really nice, almost sun cream like smell to it and it is of really thick consistency. The peel claims to reduce oil, remove impurities, balance troubled skin and reduce the cause of blemishes. It contains all natural ingredients from the hive such as manuka honey and purified bee venom and is proven to have anti-bacterial and skin smoothing benefits. I let the mask sit on my face for 15-20 minutes until it was dry and then began to peel it off, it you have some fine baby hairs on your face be prepared! It was rather painful! Once the mask was completely off my face looked a lot smoother, brighter and also felt amazingly soft. I would highly recommend anyone with problem skin or slightly larger pores to give this mask a try as it truly draws everything out of your skin, but be sure to use a really hydrating moisturiser afterwards. I have only used this mask once so far but I will definitely be trying more from the Manuka Doctor range.

MAC Cosmetics - The Matte Lip Collection.

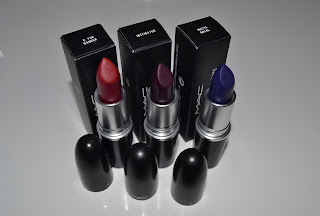
So having heard so much about this collection I was eager to get my hands on some of these matte lipsticks! When the collection came out on the 8th of August, I was straight onto MAC's website to order a few. Although I am deeply in love with MAC Whirl lipliner I opted to go for some darker shades with the weather starting to feel like autumn here in the UK! I ended up ordering three of the shades from the collection and eagerly waited at my letter box for them to arrive! 


 (D for Danger, Instigator and Matte Royal) 
 (Matte Royal, Instigator and D for Danger without flash)
 (Matte Royal, Instigator and D for Danger with flash)
 
The two shades I was most excited about were Instigator and Matte Royal. Instigator is an amazing deep smoky purple shade but is not an easy one to wear, you can't expect to line your lips and put it straight on, you have to prep your lips for this colour. To do this I use Lush Mint Julips and apply a lip balm before starting my makeup so I know I will have soft/smooth lips when I come to applying this particular shade of lipstick. Matte Royal was a little disheartening for me, having seen so many of the make-up artists that I follow on instagram wearing this shade I expected it to be a lot more of a navy royal blue, however the shade is beautiful none the less! Again I would suggest prepping the lips before for a smoother application. D for Danger is an absolutely gorgeous colour, although I do think if you already own Viva Glam I, then I would give D for Danger a miss!